The other day my daughter ( 2nd grade, 7 y/o) said to me, "Mom, You know those offices that Ace gets to use at his school? Can I have one?"
I looked at my child and said, "uuummmmmm Yes!!!!" "Hold on a minute".. My mind was racing with crafty goodness!!! I had a trifold science board down in the basement and my brain was whirling with ideas. *I know where my daughter gets her annoying love of crafting from. *
I cut the board in half. One for her and one for her brother. They were thrilled. I then hooked her "bygel" pencil cup holder and she was set.
**Only........
My mind wanted better. I wanted to make something she could use for the year. I quickly posted a picture on the Facebook ACE group page and went on to thinking of ideas. *I really love those moms on the Facebook page. They're very encouraging and supportive. Gotta love that.*
I decided to remake them that weekend and I DID!! here is the end results and we all love them.
I went to Pinterest to find some inspiration...NOTHING!! Nada!! I found a few for school centers and even for homework stations but nothing specifically for ACE.
I wanted something that would make it more convenient and help to keep them organized.
 |
| Here is my 2nd graders "cubby". |
Now for the details......
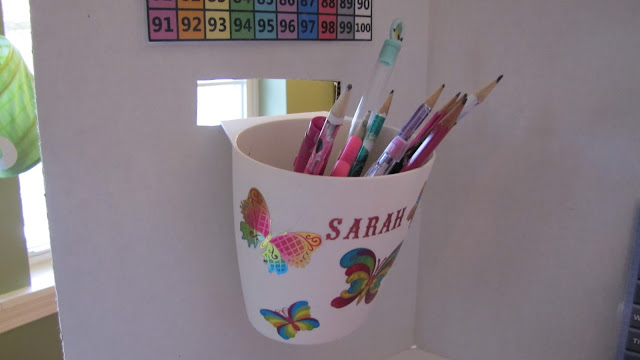
This is the "bygel" cup from Ikea. This is holds A LOT!! She has pencils...all types including a "smencil" (Scented pencil), extra erasers, sizzors, glue and even a roller of an essential oil that she likes. We decorated the cup. *Could it be any girly?? I cut a rectangle, 4" long by 1-1/4 " with an exacto knife. Then you can slip the cup in. Keeps it off the table and doesn't waste room on the board.
This is her "goal card". I laminated this and put velcro on the back. I used a Sharpie to write in the pages she needs to do for the week and she crosses them out with a dry erase marker. At the end of the week I wipe it off with a magic eraser and write in the next weeks work. She loves to cross things off a list.She's a "box checker". We were using these without the lamination but I couldn't find a way to make a pouch to hold the card that I liked. So I tried this and it works well. That said, I have no problems buying these from ACE because they don't charge much for them. This just worked for the board.
**Tip** Put the velcro dots along the top of the card where you don't write so that they don't get in the way.
If you look along the right hand side, there is a sheet. For this I used a page protector. I simply cut off the binder holes, added some velcro tabs to the back and created a document from word with her memory verses for the current pace she's working on. I will just slip this out and put in the new one when she switches paces every 2-3 weeks.
I made one for David, my little Caveman. He loves it. He said to me, "Oh you gave me a goal card too?" He isn't ready for a goal card yet but I made one for him so that we have it when he's ready. I also have a page protector up on his left hand side for the future.
Caveman is a righty, so his Bygel cup is on the right for him. Right now he uses this when he does his math and reading. hanging on his with some clips are his Sunday School projects and his school work for tomorrow.
Here is how they're used during our school day. Sarah is a lefty and I sit on her right side and David is on the other side, and I sit on his right side, so it works out well, When they're done for the day, they take their "cubbies" and put them on the shelf running along our white board. Then they have the table to play, craft and and to make a club house with blankets.
Here they are stored in front of our white board.
I hope this helps and if anyone has any suggestions to make these better, please put them in the comments section!!
Enjoy!!
God Bless,
Laura


Love them! They look great ��
ReplyDeleteThanks Melissa!!
ReplyDelete“Feels like a higher-end device.” Ace Ultra Premium
ReplyDeletePerfect pocket-sized vape. ace ultra premium
ReplyDelete